


The binding stitch is a handy stitch to add to your add to your needlepoint tool box, particularly when it comes to self finishing projects.
The binding stitch adds a sturdy “finished” edge to your canvas. It can be used on projects such as keychains, belts, purse straps and headbands to help with wear and tear over time. It is always the very last step to finish a canvas, once the rest of the project is stitched.
Not every canvas should receive a binding stitch! If you are not finishing the canvas yourself, it is important to check with your finisher whether or not they want you to add one.
We just released a brand new collection of self finishing headbands by SCT designs. They’re just darling! Click here to check them out. You will need to know how to do a binding stitch to finish the project yourself! (Alternatively, you can also send them back to us for finishing!)
How do you do the binding stitch? Once you get the hang of it, it’s so easy! Check out our step by step tutorial below.
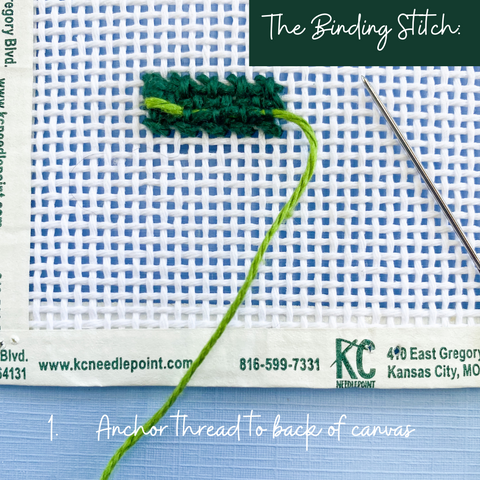
Step 1:
Begin by securing your thread to the back of the canvas. You can do this by running through a few stitches on the back of the canvas. We usually recommend matching your thread for the binding stitch to the background color of the canvas, unless you purposely want it to contrast.

Step 2:
Bring your needle and thread to the front of the canvas, And come up in the corner of your design. We will be working from right to left.

The binding stitch adds a sturdy “finished” edge to your canvas. It can be used on projects such as keychains, belts, purse straps and headbands to help with wear and tear over time. It is always the very last step to finish a canvas, once the rest of the project is stitched.
Not every canvas should receive a binding stitch! If you are not finishing the canvas yourself, it is important to check with your finisher whether or not they want you to add one.
We just released a brand new collection of self finishing headbands by SCT designs. They’re just darling! Click here to check them out. You will need to know how to do a binding stitch to finish the project yourself! (Alternatively, you can also send them back to us for finishing!)
How do you do the binding stitch? Once you get the hang of it, it’s so easy! Check out our step by step tutorial below.
Step 1:
Begin by securing your thread to the back of the canvas. You can do this by running through a few stitches on the back of the canvas. We usually recommend matching your thread for the binding stitch to the background color of the canvas, unless you purposely want it to contrast.
Step 2:
Bring your needle and thread to the front of the canvas, And come up in the corner of your design. We will be working from right to left.
Step 3:
Fold your canvas, and go back down two canvas holes down (skipping over two canvas threads vertically) and one canvas hole to the left (skipping over one thread).

Step 4:
Shift one hole (one thread) to the left and repeat the process.

Step 5:
Count back two holes (three canvas threads) and repeat the process. You will see this will create a cross with your thread in the canvas.

Step 6:
Shift one canvas hole (one thread) to the left of your farthest left stitch and repeat the process.
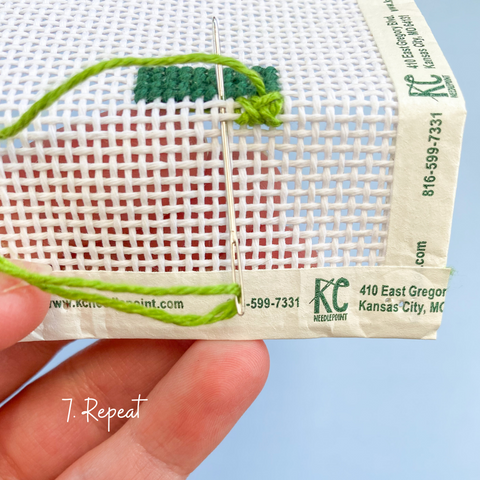
Step 7:
Repeat

Step 8:
Continue in this way until you have gone as far to the left as you can on your canvas.
Step 8:
Continue in this way until you have gone as far to the left as you can on your canvas.
For more information, take a look at the video below.