


Needlepoint Bow Ties have arrived... they couldn't be cuter! Sara from SCT Designs has done it again! You may remember her barrette and headband designs from earlier this year! She comes up with the most amazing self finishing items for stitchers.
If you're looking for a quick stitch project this holiday season, these are great!
Plus they totally round out a holiday outfit.
Click the link below to shop kits!
If you're looking for a quick stitch project this holiday season, these are great!
Plus they totally round out a holiday outfit.
Click the link below to shop kits!
Follow the step by step instructions below to finish your bow tie kit.
Materials:
Barrette Canvas- Stitched
Barrette Canvas- Stitched
Extra thread for binding stitch
Alligator Clip (included in kit)
Glue Gun
Ribbon- 6" of 2" width ribbon, 5" of coordinating 1" ribbon (this will be visible from the front of the canvas)
1.5- 2" metal aligator clip
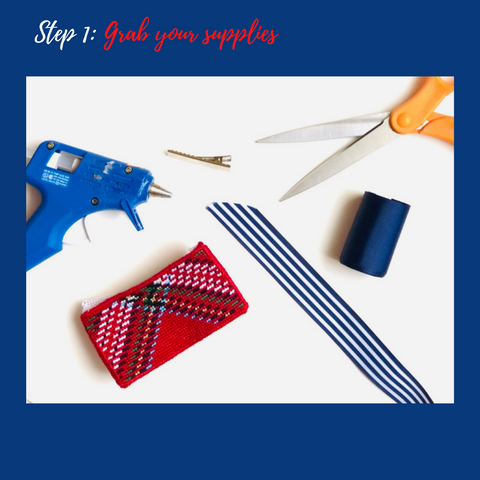
Step 1:
Gather your materials!
Follow the list above and grab all the materials you need. If you ordered a kit from KC Needlepoint, you already have all your supplies.
Step 2:
Add your binding stitch!
The binding stitch should be added to all four sides of the canvas. If you are unfamiliar with the binding stitch, follow our tutorial on how to do it here!

on the back of your needlepoint piece. Start at one end and tuck the cut end of
your ribbon under itself (approximately 1/4 inch or whatever length folds most
easily for you), securing it with glue from underneath to create an easy,
seamless edge. The ribbon width is sized to cover up all of your unstitched
mesh edges, although some binding stitch may remain visible on the
underside.

Alligator Clip (included in kit)
Glue Gun
Ribbon- 6" of 2" width ribbon, 5" of coordinating 1" ribbon (this will be visible from the front of the canvas)
1.5- 2" metal aligator clip
Step 1:
Gather your materials!
Follow the list above and grab all the materials you need. If you ordered a kit from KC Needlepoint, you already have all your supplies.
Step 2:
Add your binding stitch!
The binding stitch should be added to all four sides of the canvas. If you are unfamiliar with the binding stitch, follow our tutorial on how to do it here!
Step 3:
Trim the canvas!
Once you have added the binding stitch, trim the canvas. You will want to cut the entire canvas down so that there is only (approximately) 3-4 rows of canvas exposed. This will mean that the interior mesh does not buckle on the underside of the canvas. At this point you should have an even, flat strip of needlepoint with just enough mesh left to add glue.

Now you can begin glueing your grosgrain ribbon to the unfinished mesh edgesStep 4:
Add your ribbon.
on the back of your needlepoint piece. Start at one end and tuck the cut end of
your ribbon under itself (approximately 1/4 inch or whatever length folds most
easily for you), securing it with glue from underneath to create an easy,
seamless edge. The ribbon width is sized to cover up all of your unstitched
mesh edges, although some binding stitch may remain visible on the
underside.
Step 5:
Shape the canvas
You should now have one flat, seamless piece of ribbon-backed needlepoint that is ready to pinch into a bow tie. To do this, thread your needle with a moderate length of any thread color and tie the end of the thread into a double knot that will
not pull back through the mesh. Using your non-stitching hand, pinch your bow tie in the center, creating one “hill”and one “valley” with your fingers as shown.
not pull back through the mesh. Using your non-stitching hand, pinch your bow tie in the center, creating one “hill”and one “valley” with your fingers as shown.
Starting on the front bottom of the piece, push your threaded needle all the way through your hill and valley pinch to the back of the top side. Pull your thread all the way through until the knot stops your thread.
Pull your needle tight and wrap it several times around the pinched needlepoint piece securing the shape into a bow tie. Tuck your thread under the wraps to secure it.

Step 6:
Add your ribbon
Glue the edge of your coordinating 1 inch grosgrain ribbon to the top back of the bow tie as shown. We like to use a coordinating stripe, but solid or other patterns such as polka dot or chevron could also be cute options. Pull the ribbon around and glue the other end to the back to complete the loop. Trim any excess ribbon length.

Step 7:
Add your clip
Center your alligator clip onto the back of your bow tie and glue it into place, covering some of the raw edges of the looped ribbon as you glue. Please pay
attention to the direction of your clip before glueing if you would like the bow
tie to be oriented upside down or right side up. The dominant hand usage of
the person using the bow tie and the direction required to slide between the buttons of a dress shirt may inform this decision.

Step 8:
Wear your self finishing item with pride!
To shop kits click here!
Don't wait to order... they won't be here for long!